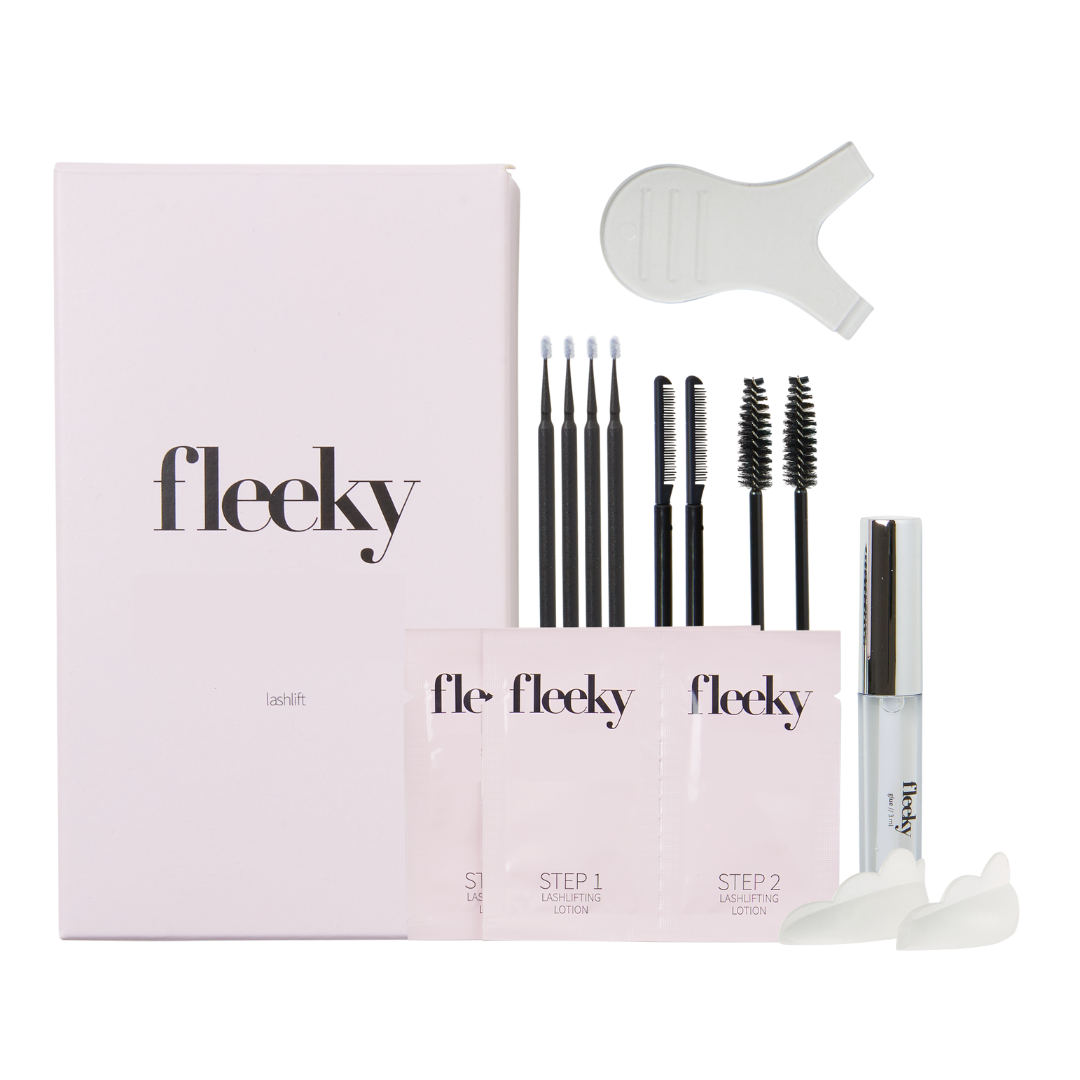
- Bundles ✨ novità
- Kit
-
Corpo & pelle
Paese/Area geografica
Lingua
💖 Subscribe to our Newsletter and get 10% off 💖
💛 Let's get tanned! Gratis Applikator zu jedem Tanning Produkt 💛
Paese/Area geografica
Lingua
Carrello
Il tuo carrello è vuoto

Per un'applicazione di successo, ti raccomandiamo vivamente di seguire le istruzioni e i singoli passaggi nel video. In questo modo eviterai possibili errori e garantirai un'applicazione senza intoppi. Per ulteriori informazioni, consulta la sezione FAQ qui sotto. Per chi usa il prodotto per la prima volta, consigliamo di seguire il video tutorial.
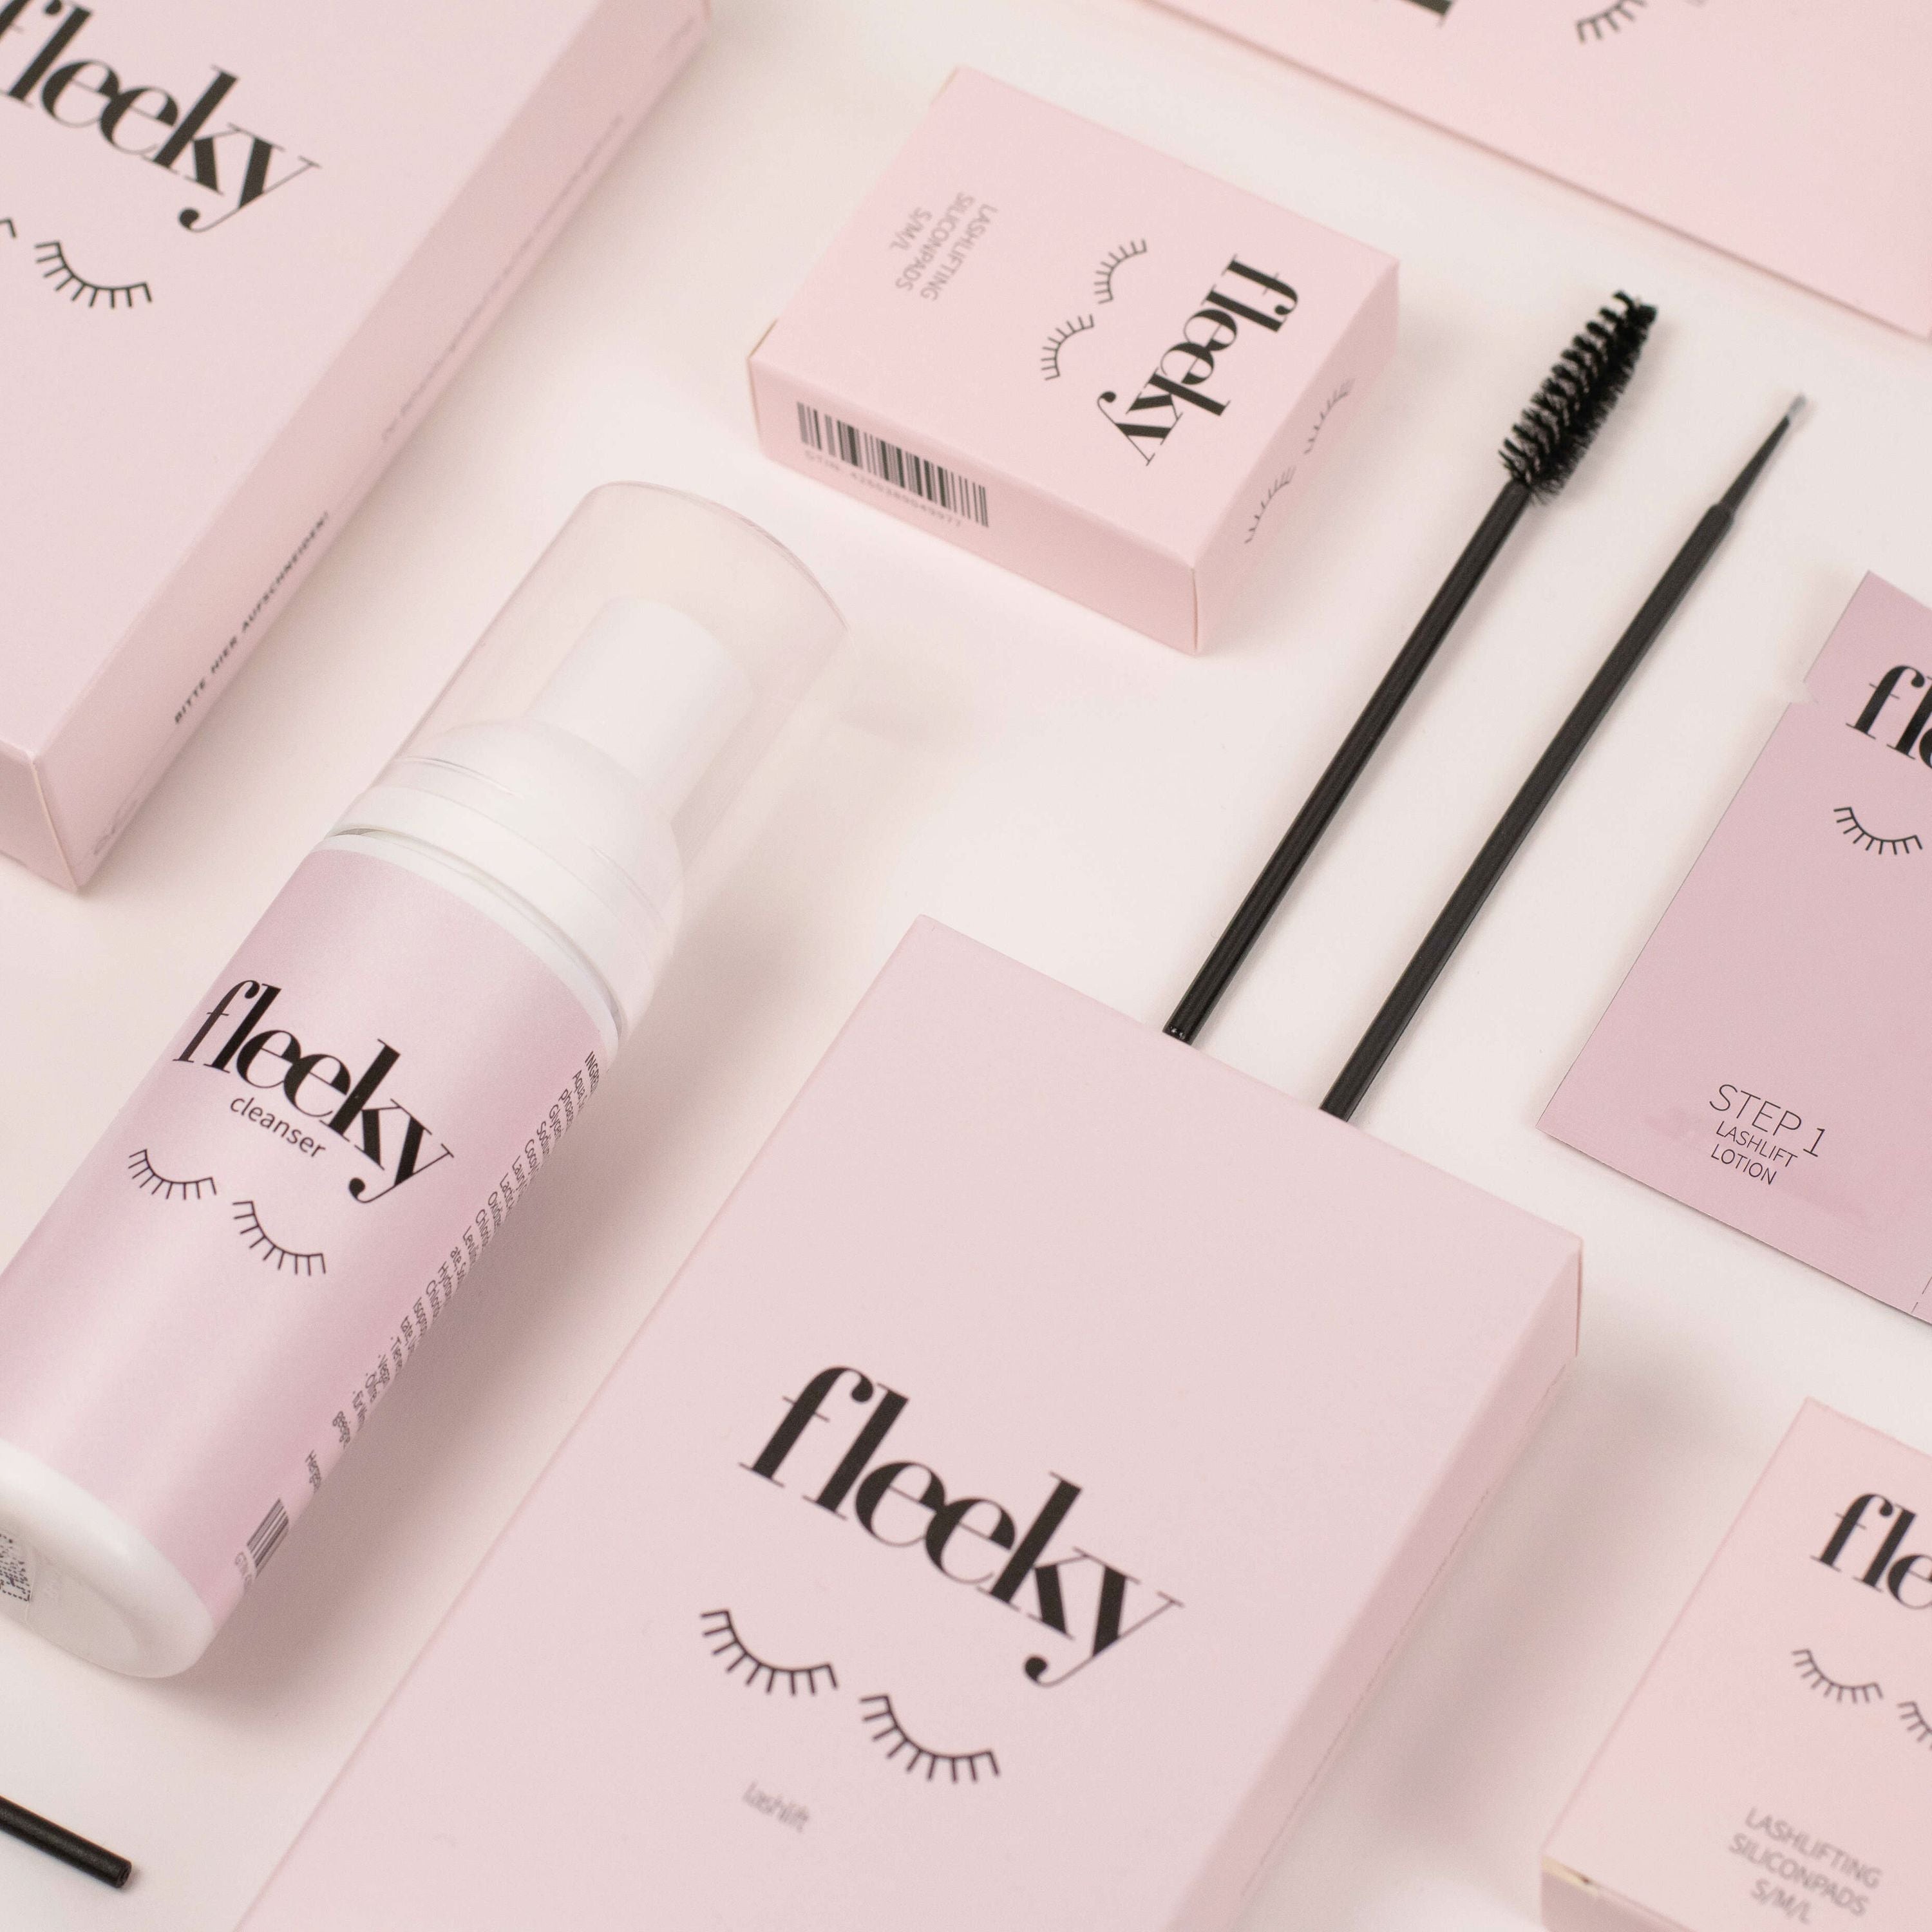
Step 1: Detergi e sgrassa
Rimuovi accuratamente il trucco intorno agli occhi con un batuffolo di cotone. Pulisci le ciglia singolarmente con il detergente e lo spazzolino.

Step 2: Posiziona il cuscinetto in silicone
Applica la colla sul retro dei cuscinetti in silicone e attaccali direttamente alla palpebra.

Step 3: Fissa le ciglia
Applica la Lashlift Glue sul cuscinetto in silicone e lasciala asciugare per 2-5 secondi. Con il lato liscio del pettine rivolto verso l'alto, distribuisci le ciglia sul cuscinetto precedentemente coperto dell'adesivo. Usando il lato a dentini del pettine e il sollevatore, alza individualmente le ciglia verso l'alto, e fissale in posizione. Assicurati che il cuscinetto in silicone aderisca saldamente alla palpebra e non scivoli.
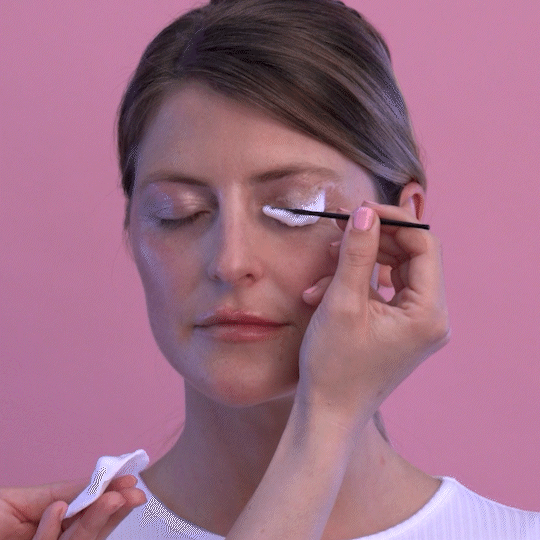
Step 4: Potere alle ciglia! La Lozione ciglia – Step 2
Applica la Lozione ciglia – Step 1 appena sopra le radici e NON allungarle. Lascia in posa per 10 minuti, poi rimuovi accuratamente con un batuffolo di cotone.

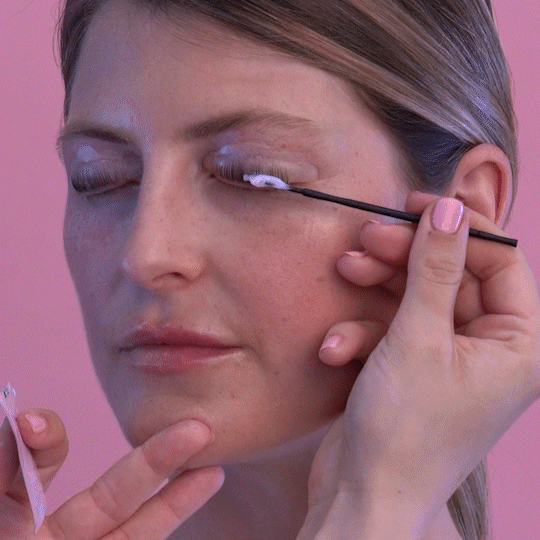
Step 5: Sollevale! Con la Lozione ciglia – Step 2
Applica la Lozione ciglia – Step 2 appena sopra le radici dei capelli, senza tirare. Lascia in posa per 10 minuti e poi rimuovi accuratamente con un batuffolo di cotone. Se stai usando un siero per la crescita delle ciglia, prolunga il tempo di esposizione di 2-3 minuti.

Step 6: Finito! Rimuovi il cuscinetto in silicone
Passa un batuffolo di cotone inumidito sulle ciglia fino a quando non si staccano dal cuscinetto di silicone. Rimuovi con cautela il cuscinetto dalla palpebra, pulisci la palpebra con un batuffolo di cotone umido e rimuovi i residui di adesivo. Pettina le ciglia con lo scovolino. Ecco fatto!
Step 1: Detergi e sgrassa
Rimuovi accuratamente il trucco intorno agli occhi con un batuffolo di cotone. Pulisci le ciglia singolarmente con il detergente e lo spazzolino.
Step 2: Posiziona il cuscinetto in silicone
Applica la colla sul retro dei cuscinetti in silicone e attaccali direttamente alla palpebra.
Step 3: Fissa le ciglia
Applica la Lashlift Glue sul cuscinetto in silicone e lasciala asciugare per 2-5 secondi. Con il lato liscio del pettine rivolto verso l'alto, distribuisci le ciglia sul cuscinetto precedentemente coperto dell'adesivo. Usando il lato a dentini del pettine e il sollevatore, alza individualmente le ciglia verso l'alto, e fissale in posizione. Assicurati che il cuscinetto in silicone aderisca saldamente alla palpebra e non scivoli.
Step 4: Potere alle ciglia! La Lozione ciglia – Step 2
Applica la Lozione ciglia – Step 1 appena sopra le radici e NON allungarle. Lascia in posa per 10 minuti, poi rimuovi accuratamente con un batuffolo di cotone.
Step 5: Sollevale! Con la Lozione ciglia – Step 2
Applica la Lozione ciglia – Step 2 appena sopra le radici dei capelli, senza tirare. Lascia in posa per 10 minuti e poi rimuovi accuratamente con un batuffolo di cotone. Se stai usando un siero per la crescita delle ciglia, prolunga il tempo di esposizione di 2-3 minuti.
Step 6: Finito! Rimuovi il cuscinetto in silicone
Passa un batuffolo di cotone inumidito sulle ciglia fino a quando non si staccano dal cuscinetto di silicone. Rimuovi con cautela il cuscinetto dalla palpebra, pulisci la palpebra con un batuffolo di cotone umido e rimuovi i residui di adesivo. Pettina le ciglia con lo scovolino. Ecco fatto!


Informazioni sul prodotto
Generali
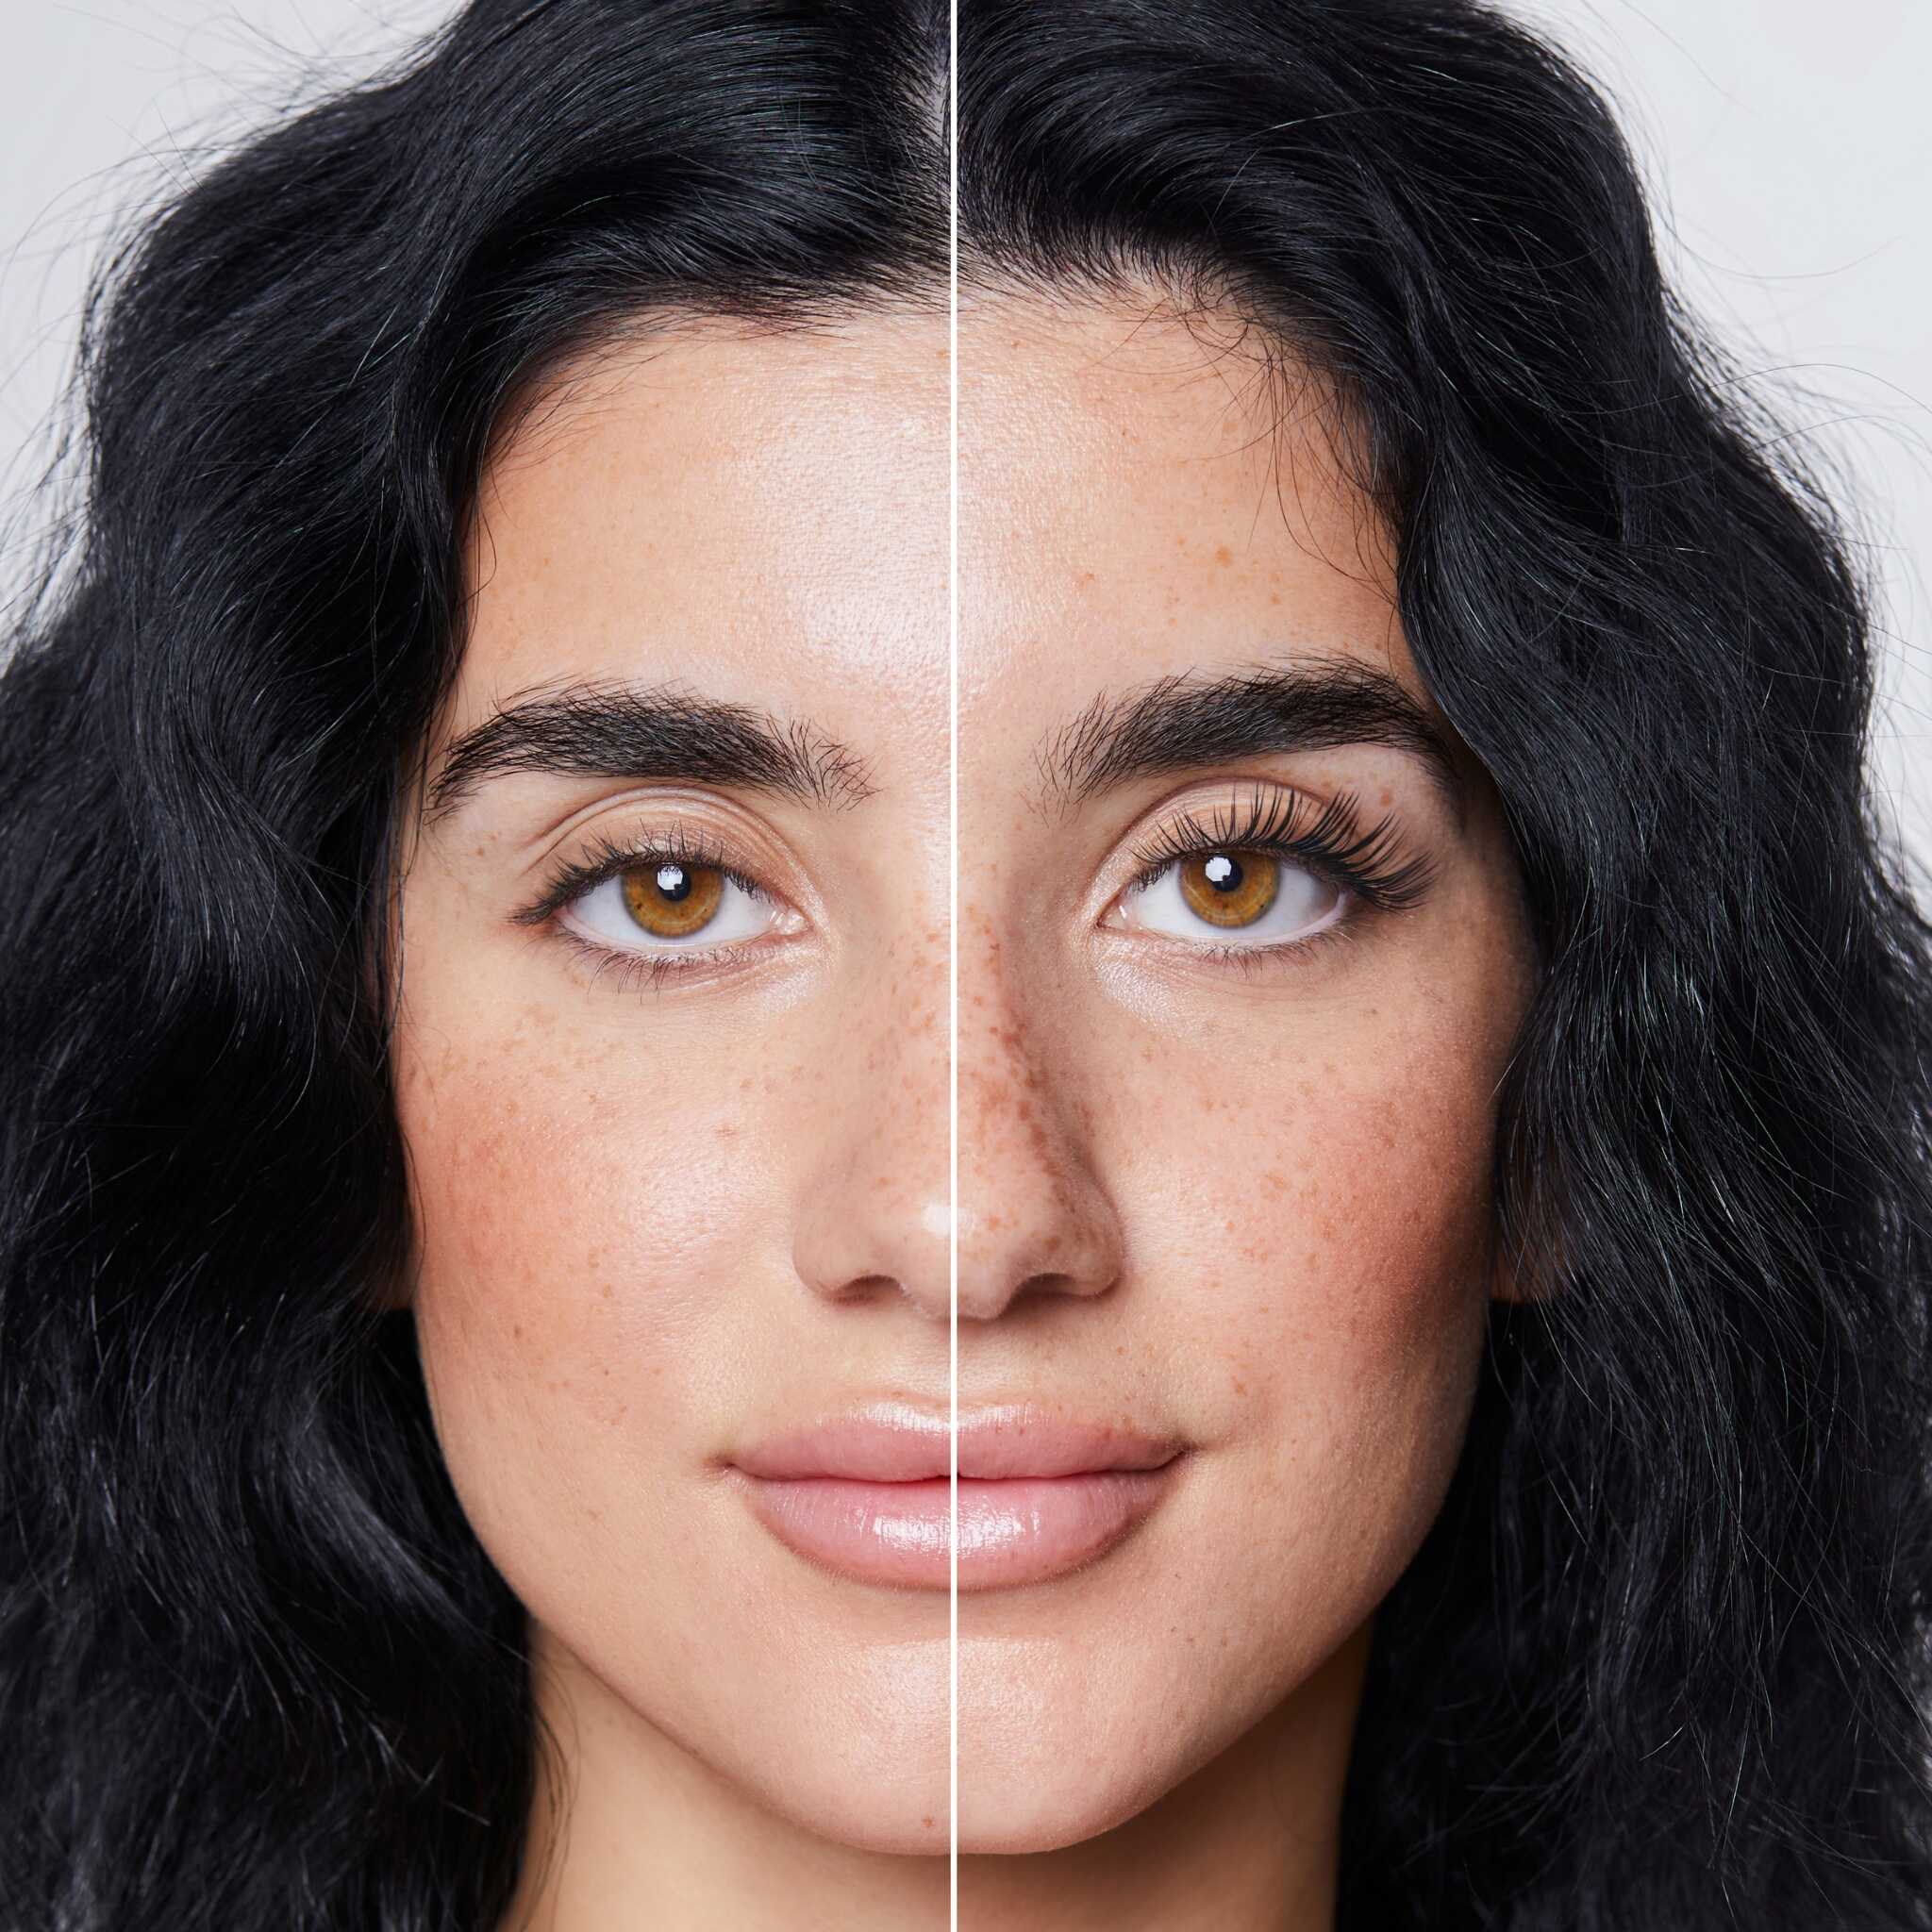
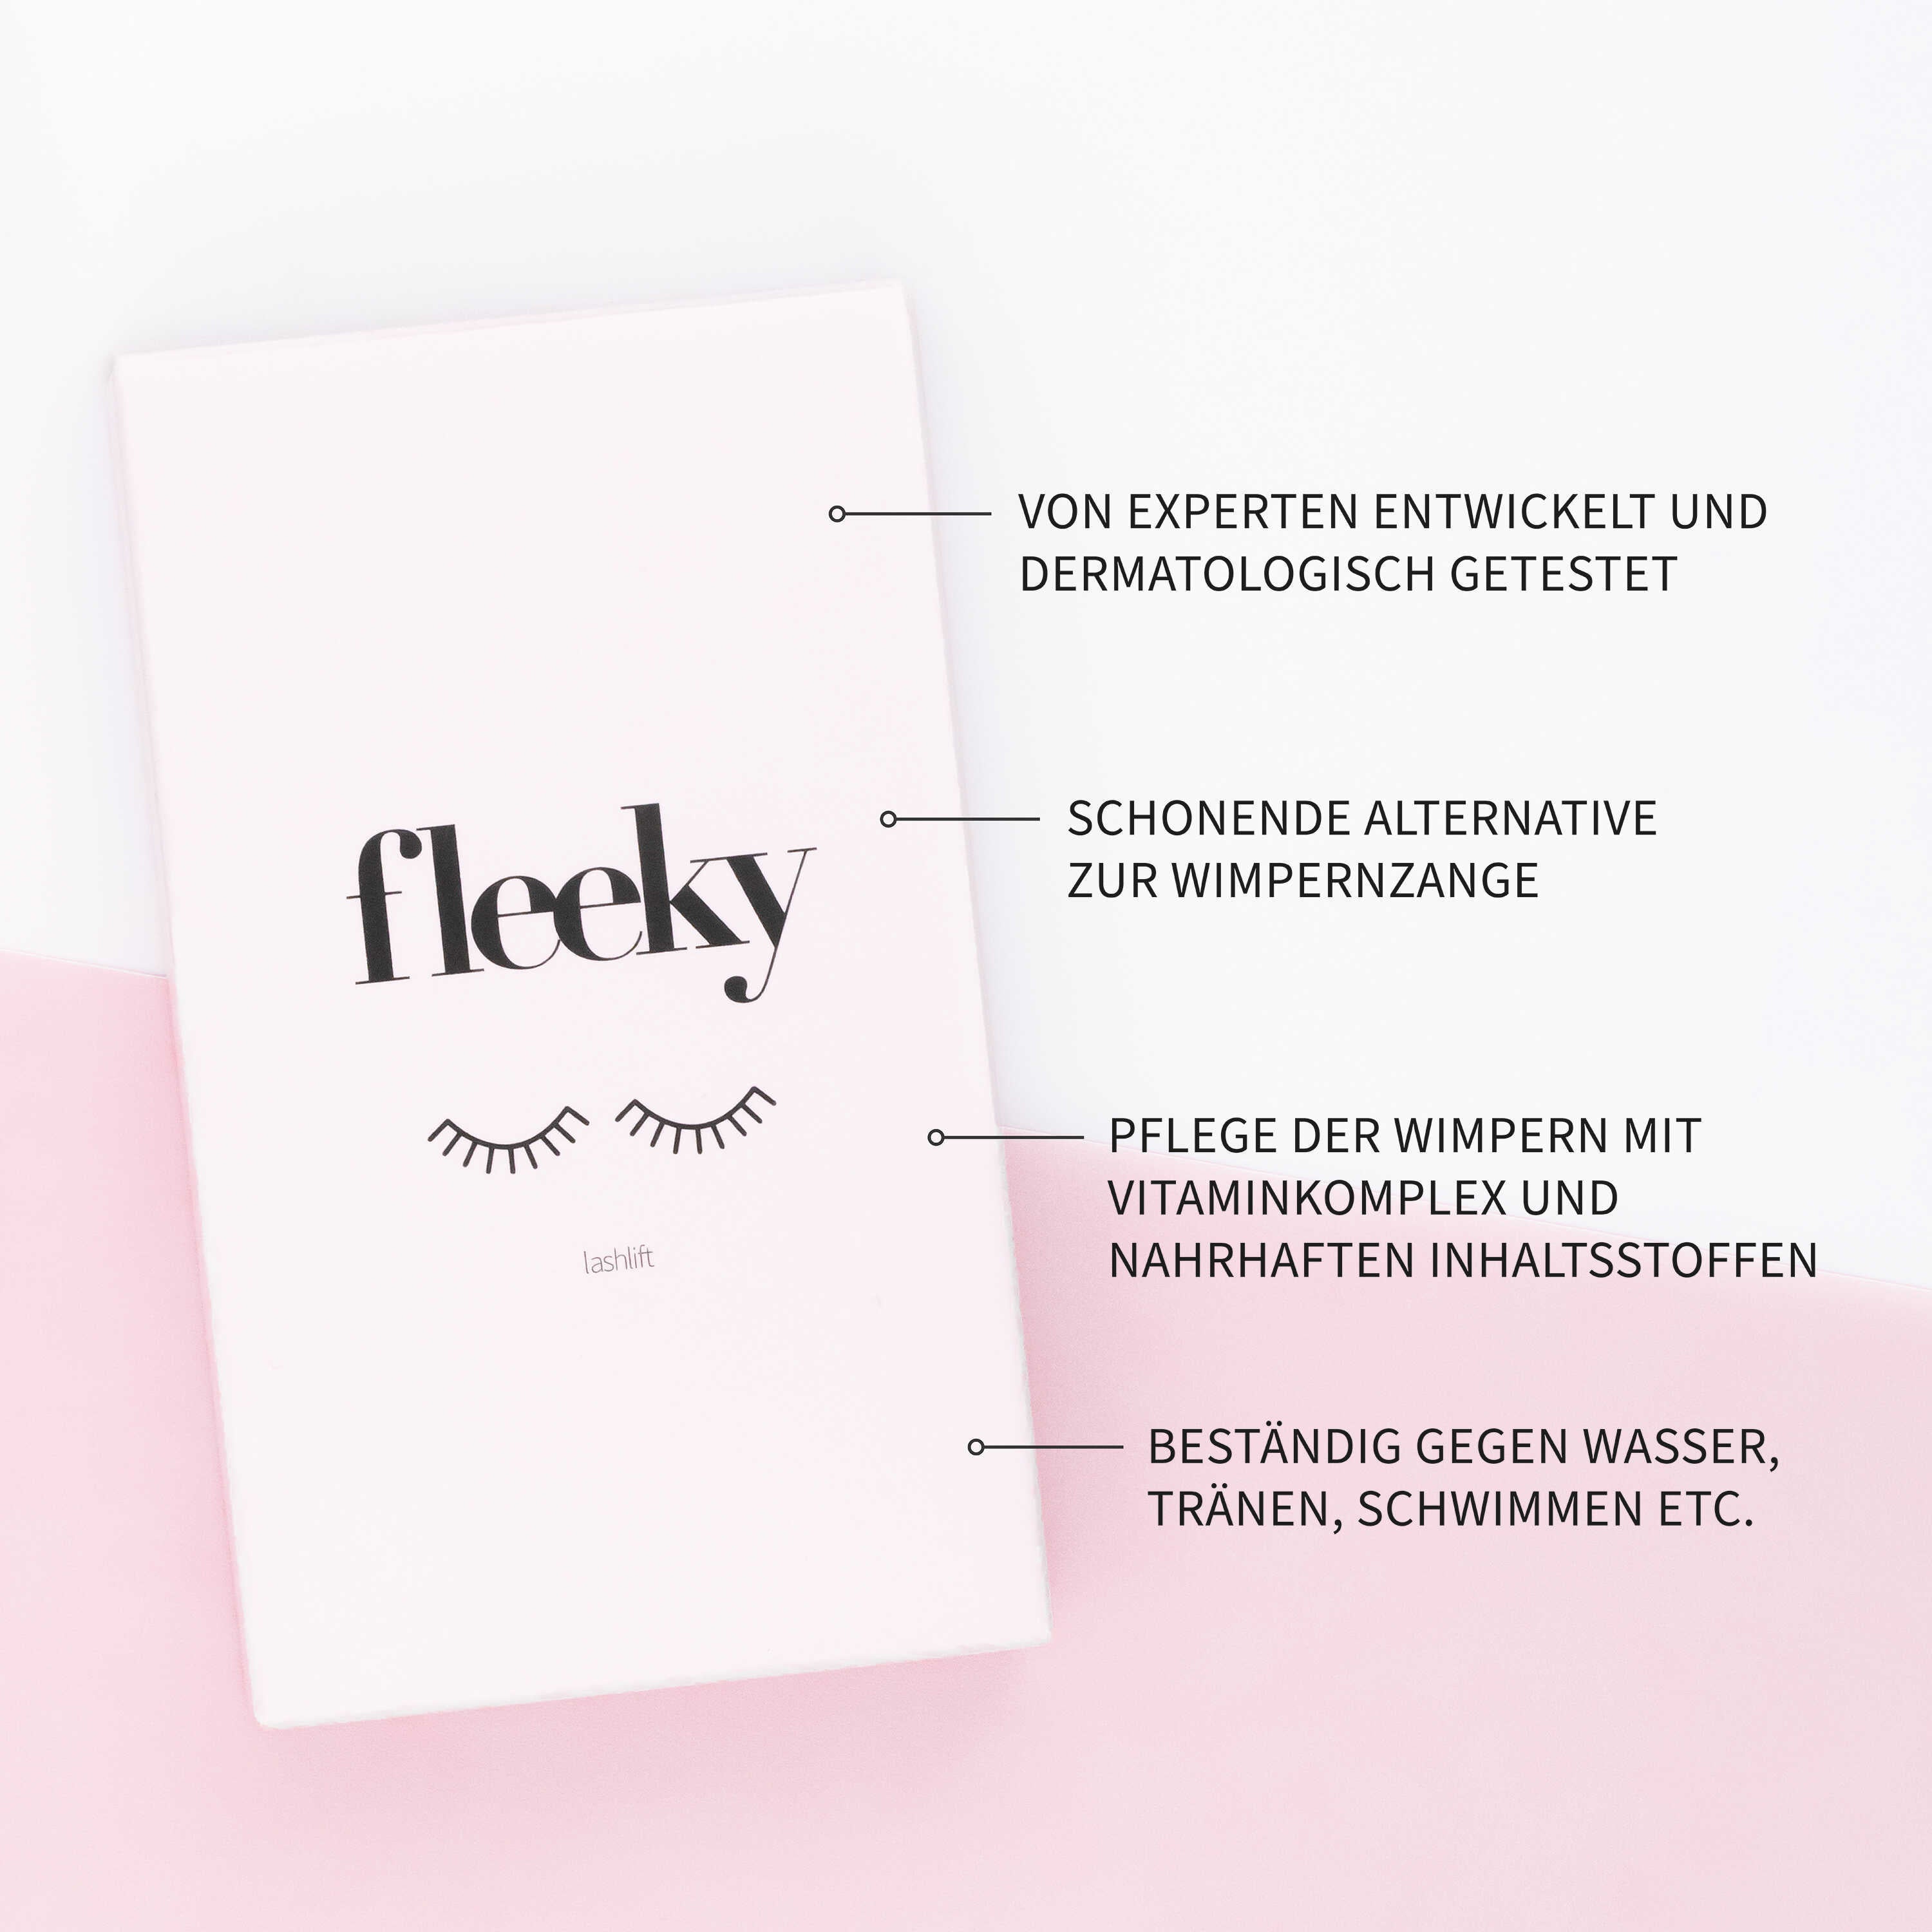
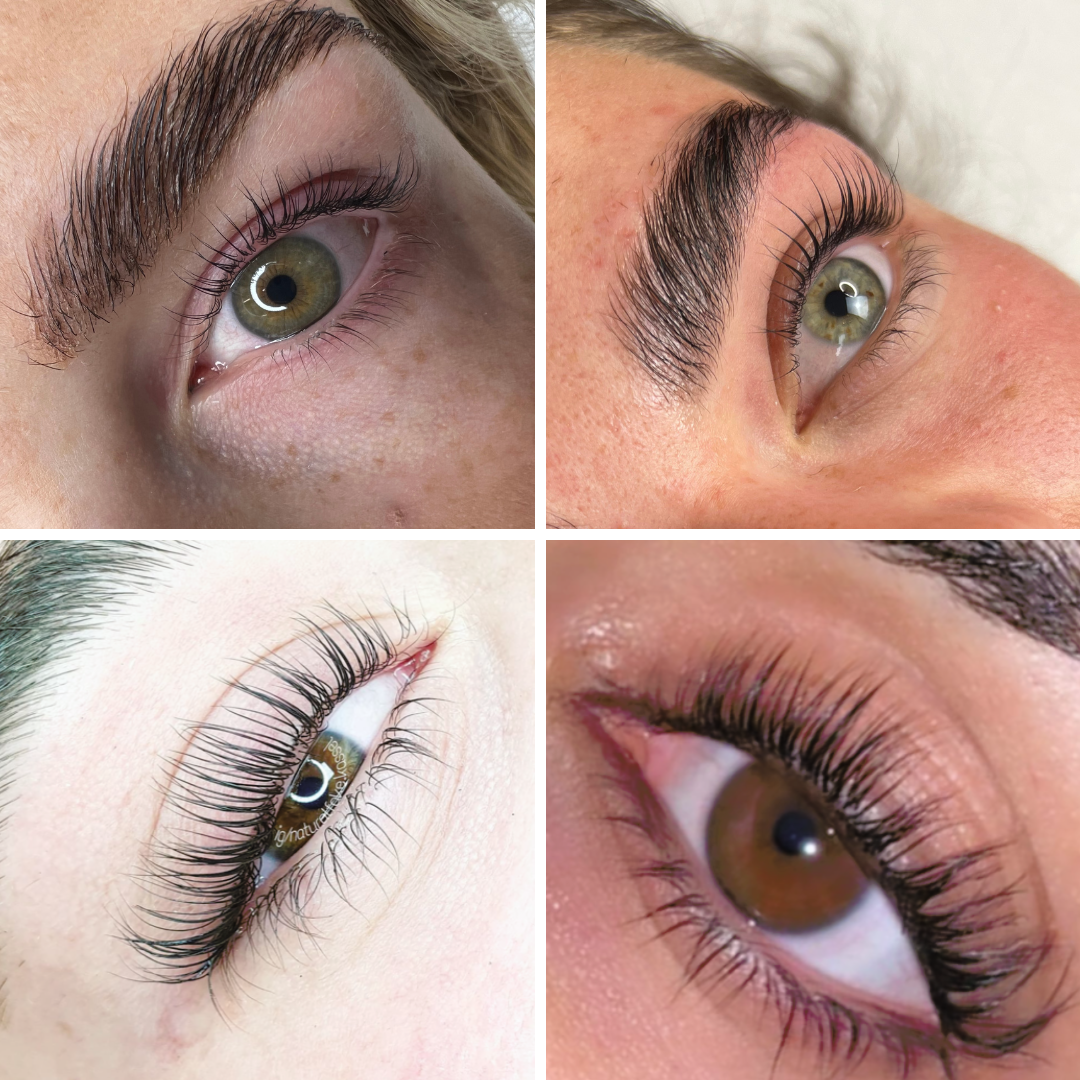
Il Lashlift è un'alternativa naturale alle ciglia artificiali e garantisce ciglia folte con un'arricciatura ottimale. Il lifting delle ciglia è un nuovo metodo per dare alle ciglia la forma desiderata per un periodo di tempo più lungo senza utilizzare un piegaciglia.
Il lifting fa sembrare gli occhi più grandi e le ciglia appaiono naturalmente belle anche senza mascara. Con un lifting delle ciglia doni alle tue ciglia più volume, densità e curvatura in modo ben tollerato.
Nella prima fase (Lozione 1), la struttura cheratinica del capello viene rotta, le ciglia diventano elastiche e visivamente allungate.
Nella seconda fase (Lozione 2), le ciglia vengono trattate con prodotti volumizzanti e fissate nella forma desiderata. In questo modo le ciglia appaiono permanentemente più lunghe e più spesse e danno loro l'arricciatura desiderata.
Il lifting delle ciglia è adatto ad ogni tipo di capelli e ciglia. Sia le ciglia corte che quelle molto lunghe possono essere modellate nella forma desiderata con il giusto cuscinetto in silicone. Non preoccuparti, non è necessario essere un professionista della cosmetica per eseguire l'applicazione: come tutti sappiamo, la pratica rende perfetti!
Note sul prodotto
Il Lashlift è un'alternativa naturale alle ciglia finte e garantisce ciglia folte con una curvatura ottimale. Il Lashlifting è un nuovo metodo per modellare le ciglia nel modo desiderato per un periodo prolungato senza l'uso di un piegaciglia.
Gli occhi sembrano visivamente più grandi grazie al Lifting e le ciglia appaiono naturalmente belle anche senza mascara. Grazie al Lashlifting, doni alle tue ciglia più volume, densità e curvatura in modo delicato e ben tollerato.
Nella prima fase (Lozione 1), la struttura del cheratina dei capelli viene rotta, i peli delle ciglia diventano flessibili e visivamente allungati. Nella seconda fase (Lozione 2), le ciglia vengono trattate con preparati volumizzanti e fissate nella forma desiderata. Ciò fa sembrare le ciglia più lunghe e folte, ottenendo la curvatura desiderata.
Il Lashlifting è adatto a tutti i tipi di capelli e ciglia. Sia le ciglia corte che quelle molto lunghe possono essere modellate nella forma desiderata con il giusto pad di silicone. Non preoccuparti, non devi essere un professionista della cosmetica per eseguire l'applicazione - la pratica fa il maestro!
Ciglia lunghe: il Lifting è perfetto per le tue ciglia!
Ciglia dritte: il Lifting è la soluzione perfetta per dare alle tue ciglia la curvatura ottimale e farle sembrare più lunghe.
Ciglia corte: nessun problema! Il Lifting è ottimale anche per le ciglia corte!
Solitamente, un'applicazione di Lashlift dura fino a 40 minuti. Questo dipende completamente dalla tua abilità. Se stai facendo il Lifting per la prima volta, potresti impiegare qualche minuto in più per assicurarti che tutti i passaggi siano eseguiti correttamente e per ottenere il risultato desiderato.
L'applicazione del nostro Lashlift non è difficile, ma richiederà un po' più di tempo per chi è alle prime armi. Seguendo tutti i passaggi delle istruzioni e evitando eventuali errori, garantiamo che chiunque, sia un naturale o meno, possa applicare facilmente il Lashlifting.
I risultati di un'applicazione di Lashlift durano da 6 a 8 settimane. Questo dipende dalla velocità di crescita delle tue ciglia e da quanto accuratamente è stata eseguita l'applicazione. L'effetto diminuirà nel tempo, a seconda della crescita delle ciglia. Le ciglia cresceranno lentamente in modo naturale e sano, tornando alla loro forma originale.
Il Lashlift è delicato sulle tue ciglia e può essere ripetuto in qualsiasi momento, idealmente una volta che l'effetto è svanito, quindi dopo 6-8 settimane. Tuttavia, dovresti evitare di eseguire un'applicazione prima che siano trascorse 4 settimane per dare alle tue ciglia un po' di riposo. Se la tua applicazione non ha avuto successo, puoi fare un secondo tentativo immediatamente senza danneggiare le ciglia.
El levantamiento de pestañas no daña tus pestañas naturales ni su crecimiento. Nuestras lociones están dermatológicamente probadas, desarrolladas por expertos en cosmética y se someten a revisiones periódicas.
Applicazione
E' importante pulire bene le ciglia e le palpebre prima dell'applicazione. Puoi utilizzare il nostro cleanser o un altro prodotto detergente a tua scelta, come un detergente per trucco, per sgrassare completamente gli occhi. In questo modo, il tampone in silicone aderirà correttamente alla palpebra e le ciglia si attaccheranno al tampone in silicone durante l'applicazione.
La scelta corretta del pad in silicone è fondamentale per ottenere il risultato desiderato con il trattamento di sollevamento delle ciglia. C'è una formula semplice che puoi utilizzare per determinare quale pad utilizzare. Posiziona il pad sulla radice delle ciglia e pettina le ciglia verso l'alto con un pettinino per ciglia. Le ciglia dovrebbero coprire circa 1/3 del pad. In generale, puoi seguire questa guida:
Per ottenere risultati ottimali con il trattamento di sollevamento delle ciglia, è importante che le ciglia siano fissate in modo uniforme e teso sul pad in silicone utilizzando la colla. Se hai l'impressione che le tue ciglia siano molto sciolte o addirittura abbiano spazi vuoti o siano disposte in modo disordinato sul pad, è meglio iniziare di nuovo. Rimuovi la colla con un batuffolo di cotone e acqua e riprova. Dovresti separare le ciglia sul pad mentre la colla è ancora umida. Le ciglia non dovrebbero sovrapporsi perché la struttura che imposti sul pad in silicone influenzerà il risultato del sollevamento delle ciglia. Se alcune ciglia si separano, puoi semplicemente riportarle verso l'alto in posizione prima di applicare la seconda lozione.
La lozione per il sollevamento delle ciglia deve essere posizionata alla base delle ciglia e deve coprire 1/3 delle ciglia. È estremamente importante evitare di toccare le punte delle ciglia con la lozione! Il sollevamento funzionerà solo se la lozione viene posizionata correttamente, poiché qui viene definito il punto di curvatura delle ciglia.
Il segreto per la corretta dosatura delle lozioni è di non utilizzare troppo né troppo poco. Dovresti sicuramente applicare più di uno strato sottilissimo e la lozione dovrebbe essere chiaramente visibile sul pad in base al suo colore e alla sua consistenza. Non risparmiare sulla lozione, ma assicurati di evitare le punte delle ciglia! Non è necessario utilizzare l'intero sacchetto, ma solo quanto basta per coprire bene 1/3 del pad.
Il tempo di posa dipende dalla struttura delle tue ciglia. Se hai ciglia sottili e leggere, ti consigliamo un tempo di posa di 10 minuti. Se invece hai ciglia spesse, ti consigliamo 12 minuti. Non lasciare la lozione in posa per più a lungo.
Prendi un cotton-fioc o un dischetto di cotone e rimuovi la lozione facendo scorrere il cotton-fioc o eseguendo leggere passate con il dischetto di cotone. Fallo sempre in direzione delle sopracciglia e non verso il basso. Assicurati anche che la lozione sia completamente rimossa. Se sotto una leggera pressione alcune ciglia si sono staccate, riattaccale con l'adesivo sul pad di silicone.
Le nostre due lozioni per il lash lifting hanno modalità di azione diverse, quindi è importante utilizzare un bastoncino separato per ciascuna lozione, in quanto altrimenti potrebbero perdere la loro efficacia.
Errori comuni & come evitarli
Perché il tuo pad in silicone non aderisce alla palpebra potrebbe dipendere da diversi motivi. Ecco alcuni suggerimenti da tenere presente:
Seguendo questi consigli, dovresti essere in grado di far aderire il pad in silicone in modo più efficace alla tua palpebra.
Prima di incollare il pad in silicone, assicurati che davvero tutte le ciglia siano posizionate sopra il pad e che nessuna ciglia finisca accidentalmente sotto il pad in silicone, in modo che tutte le ciglia siano ben sollevate. Per farlo, pettina le ciglia verso il basso utilizzando il pettinino per ciglia e poi posiziona il pad in silicone sulla palpebra.
Utilizza una quantità adeguata ma non eccessiva di colla per fissare le ciglia. Ti consigliamo di lavorare dall'interno verso l'esterno. Applica sempre un po' di colla sulla zona del pad dove desideri attaccare le ciglia. Lascia asciugare la zona per 20-30 secondi e poi pettina le ciglia verso l'alto utilizzando lo strumento a forma di Y per posizionarle sul pad. Assicurati anche qui di separare le ciglia e di posizionarle sul pad a un angolo di 90 gradi. Se alcune ciglia si staccano di nuovo, ripeti il processo e, se necessario, applica un po' più di colla.
Il problema più comune e la causa di applicazioni insoddisfacenti nel Lashlifting è spesso attribuito alla colla. Tuttavia, l'errore non risiede necessariamente nella qualità della colla, ma piuttosto nell'applicazione errata. Ecco alcuni consigli per evitare frustrazioni:
Fattore 1: Il Pad in Silicone
Fattore 2: Fissare le Ciglia
Seguendo questi consigli, dovresti migliorare la tua esperienza con il Lashlifting e ottenere risultati migliori. Buona fortuna!
Assicurati che le ciglia siano ben fissate al pad in silicone con la colla. Se alcune ciglia si staccano durante il processo, non preoccuparti! Dopo il tempo di posa, puoi rimuovere la lozione come al solito e fissare nuovamente le ciglia con un po' di colla.
Ci possono essere diverse ragioni per cui la tua applicazione di Lashlifting non ha funzionato. Ripassa tutti i passaggi dell'applicazione e cerca di capire, seguendo i nostri suggerimenti, quale potrebbe essere stata la causa.
Prenditi del tempo per la tua applicazione e cerca di rilassarti durante il tempo di posa, mantenendo gli occhi chiusi.
Spedizione gratuita da 40€
Garanzia soddisfatti e rimborsati
Facile applicazione
Vegani & non testati su animali